
Untuk melakukan setting custom domain pada blogspot, ada 2 hal yang harus Anda setting, yaitu pada DNS domain dan pada blogspot Anda.
Berikut ini langkah-langkah setting custom domain blogspot :
I. Setting pada domain
Jika Anda belum order domain, silahkan order di sini
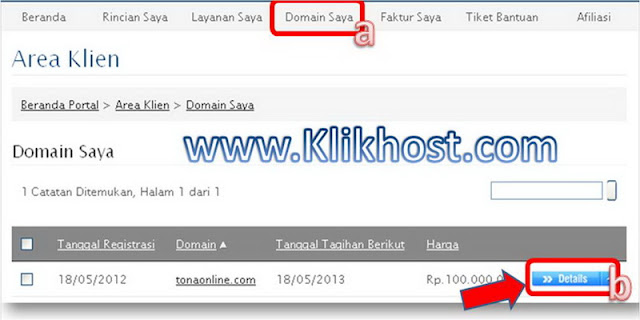
a. Setelah domain Anda aktif, silahkan login ke billing area https://klikhost.com/b lalu klik menu “Domain Saya”.
b. Klik tombol “details” pada domain yang ingin Anda setting.
c. Ganti name server yang sudah terisi dengan name server berikut :
Nameserver 1 : dns1.klikhost.com
Nameserver 2 : dns2.klikhost.com
Nameserver 3 : dns3.klikhost.com
Nameserver 4 : dns4.klikhost.com
d. Lalu klik tombol “Simpan Perubahan”.
e. Klik tombol “Pengelolaan DNS”
Jika setelah Anda klik lalu muncul keterangan “You need to activate your FREE DNS Services before you can perform this action“, itu biasanya terjadi karena nama domain Anda ada huruf besarnya. Misalnya : PabrikKulit.com. Harusnya yang bener itu : pabrikkulit.com. Hal ini bisa terjadi karena Anda mengetikkan seperti itu pada waktu order. Hal ini menyebabkan DNS management di billing tidak sinkron dengan di control panel domain. Solusinya : Kontak kami untuk membetulkannya, bisa dengan tiket support ataupun melalui email, sms, ym, bbm, gtalk dan whatsapp.
f. Masukkan data seperti pada gambar, lalu klik tombol “Simpan perubahan”
g. Masukkan data seperti pada gambar, lalu klik tombol “Simpan perubahan”
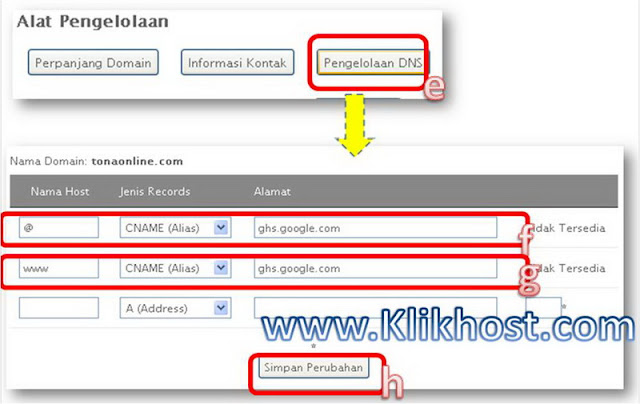
Nama Host Jenis Records Alamat
@ A (Address) 216.239.32.21
@ A (Address) 216.239.34.21
@ A (Address) 216.239.36.21
@ A (Address) 216.239.38.21
www CNAME (Alias) ghs.google.com
Untuk sementara, setting DNS ditinggal dulu. Sekarang waktunya setting pada blogspot Anda.
II. Setting pada blogspot
Login ke blogspot Anda (www.blogger.com).
Pada tutorial ini, saya menggunakan interface blogger yang terbaru.
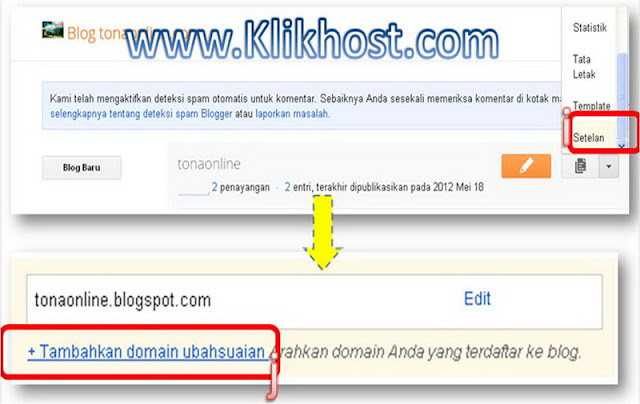
i. Cari akun blog yang akan Anda custom domainnya. Lalu klik tombol segitiga, klik “Setelan”.
j. Klik link “+ Tambahkan domain ubahsuaian”
k. Klik link seperti pada gambar
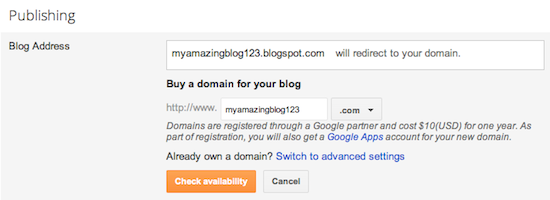
l. Masukkan nama domain di awali dengan “www.”
m. Lalu klik tombol “Simpan”
Some helpful notes:
|


Terlihat di atas bahwa ada CNAME yang harus ditambahkan di setting domain http://billing.klikhost.com untuk verifikasi domain.
Setelah Anda setting, Anda harus menunggu 1 jam, lalu tinggal klik tombol SIMPAN lagi. Setelah terverifikasi, biasanya akan bisa diakses beberapa saat lagi. Biasanya Resolve DNS membutuhkan waktu 1-3 hari.
SETTING SUBDOMAIN
Barangkali Anda ingin membuat subdomain lain untuk blogspot Anda, misalnya : toko.tonaonline.com. Ikuti langkah-langkah berikut :
1. Ulangi langkah (a), (b), (e).
2. Lakukan hal yang sama seperti langkah (g) pada kolom yang masih kosong di bagian bawah. Bedanya yaitu, kalau di langkah (g) tersebut menggunakan “www”, maka di kolom bawah tersebut Anda isikan nama “subdomain” Anda, pada contoh ini yaitu : toko. Lalu klik tombol “simpan perubahan”.
3. Ikuti langkah (i), (j), (k). Lalu pada langkah (l), masukkan : toko.tonaonline.com. Lalu ikuti langkah (m).
4. Selesai
Selamat mencoba!
Note : Jika Anda kesulitan setting, silahkan kontak kami untuk order jasa setting DNS blogspot. Biaya setting Rp. 50.000,-/blog